


INSTRUCTIONS OF IMPLEMENTATION OF BITUMINATE PLACES - TEGOLA AMERICANA
The American Tegola Bituminosa Plate is placed on tilted decks, with a slope exceeding 25%. With a slope between 15% and 25%, a POLITABER VEL 30 or similar type foil must be previously applied. Do not apply with slope less than 15%, in no case. The support can be mortar, concrete, wood, etc. In any case, the surface should be flat, homogeneous, smooth, without important cracks, and of sufficient consistency to provide security during the application and to keep the tips tightly nailed. (Not on insulating panels). Plates are applied by nailing with broad head steel tips. The support must be conditioned for fixing. A mortar layer of at least 3 cm thick must be applied on concrete walls or layer. If it is on wood, it must be treated properly for the outside. The ideal tips are the Puntas Tegola, of galvanized steel. If otherwise, they must have a wide head, 9 mm in diameter at least.
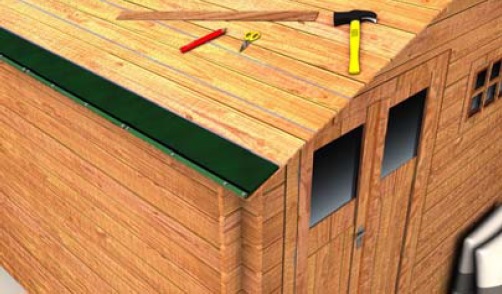
REQUIREMENTS:

Martillo and Puntas Tegola
The American Tegola Bituminosa Plate is placed on tilted decks, with a slope exceeding 25%. With a slope between 15% and 25%, a POLITABER VEL 30 or similar type foil must be previously applied. Do not apply with slope less than 15%, in no case. The support can be mortar, concrete, wood, etc. In any case, the surface should be flat, homogeneous, smooth, without important cracks, and of sufficient consistency to provide security during the application and to keep the tips tightly nailed. (Not on insulating panels). Plates are applied by nailing with broad head steel tips. The support must be conditioned for fixing. A mortar layer of at least 3 cm thick must be applied on concrete walls or layer. If it is on wood, it must be treated properly for the outside. The ideal tips are the Puntas Tegola, of galvanized steel. If otherwise, they must have a wide head, 9 mm in diameter at least.
REQUIREMENTS:
Martillo and Puntas Tegola
Scissors and “Cutter”
Hot or small blower
Marking tape, metro, rules, etc.
DIMENSIONS OF PLATES AND FIXATIONS. ZONE OF APPLICATION. (In mm).
DIMENSIONS OF PLATES AND FIXATIONS. ZONE OF APPLICATION. (In mm).

LET'S GET EXCITED
The first row of American Tegola plates will be placed so that it stands out on the side, half the width of the skirt. And down the bottom, all the skirt. Going to the height of the cut lines. Fixations will be applied, in the area below, to about 50 mm of the edge and in the positions indicated in the following figures. (approximately).
The whole 1st hilada will be completed. Note.- It will be secured well with the fixations, so that the wind does not lift it.

The skirts will be trimmed, leaving them tangled with the edge (Start wound).
The 1st hid, will be applied with the 1st plaque lying on the edge, and the following. Efforts will be made to maintain alignment. They will be fixed on the positions indicated above. They will adjust on the edges.

The 2nd hid, will be applied by placing the 1st plate displaced half the width of the skirt and the other plates adjusted on the edges. And the following hiladas, in the same way, initiating alternately with whole plate or with cut plate in the middle of the width of the skirt. Note.- In order to ensure alignment, after the 1st hid it can be marked with a proper tape or other means, parallel lines to the upper edge of the hid, displaced in 139 mm. (In the figure, applied the 1st and 2nd hiladas. Blue, alignment lines).
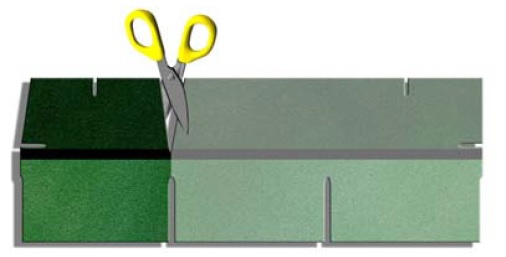
UNION OF FALDILLAS
To unite the skirts, these will be lifted and the asphalt adhesion band will be uncovered. They will be soldered by heating the band with hot air welder or flame blower. They will be pressed slightly to join.

IT 'S ALL RIGHT
The tops, smoothets, side edges, etc., will be made with pieces obtained from the plates. To do this, the following pieces will be cut from each plate, through the cutting area of the skirts:
Obtaining pieces of the view form, approximately. These pieces can be folded in half, on the axis above below, on a wooden heel, for example. To do so, the doubling area will be heated previously. These pieces will be fixed with two ends, nailed to about 25 mm, of each edge, and in the immediate area below the adhesive band. They will be covered by the next piece.
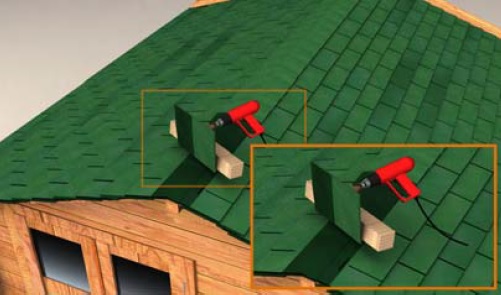
At the top, which has been reached with the plates of both sides, so that one of them overlays it and invades the other a little. These pieces will be applied by starting their placement from the area where winds are produced, more frequently.
Each piece, centered on the top, will close on the pieces of each of the skirts. They will be fixed with two ends, and each piece will cover the above in the corresponding area. They will also be welded, using hot air welder or blower.
IT'S THE END
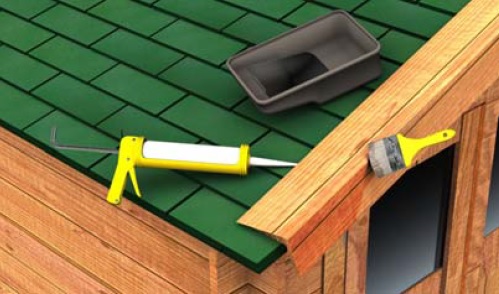
Special care should be taken to ensure that water is not penetrated at the most problematic points, using other materials that can facilitate the application or facilitate the evacuation of water. For this purpose, asphalt foils, reinforcement or finishing in hard-to-execution points can be used; also metal parts or other materials for auctions, etc. Note.- To ensure the runoff of the water, the edge can be treated with a profile or some other element that avoids runoff by the front of the facade. It will be convenient to ensure the fixing of these parts and to perform a sealing of the areas that can produce more problems, for this purpose it will be possible to use polyurethane mask, type CHOVASTAR, applied with gun, to seal together, glue pieces, skirts, etc.
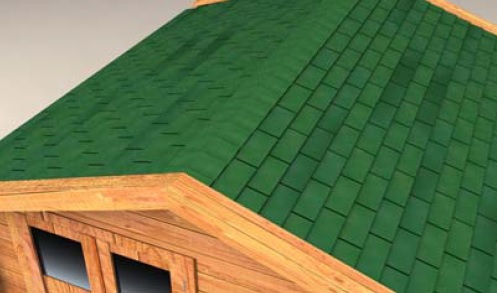
And that's how the final result should remain.

Past manual of the original instruction of the manufacturer CHOVA:
These instructions refer to the STANDARD model. The CASTOR model is applied in a similar way, with the particularities of the dimensions adjusted to the characteristic no skirts.
The whole 1st hilada will be completed. Note.- It will be secured well with the fixations, so that the wind does not lift it.
The skirts will be trimmed, leaving them tangled with the edge (Start wound).
The 1st hid, will be applied with the 1st plaque lying on the edge, and the following. Efforts will be made to maintain alignment. They will be fixed on the positions indicated above. They will adjust on the edges.
The 2nd hid, will be applied by placing the 1st plate displaced half the width of the skirt and the other plates adjusted on the edges. And the following hiladas, in the same way, initiating alternately with whole plate or with cut plate in the middle of the width of the skirt. Note.- In order to ensure alignment, after the 1st hid it can be marked with a proper tape or other means, parallel lines to the upper edge of the hid, displaced in 139 mm. (In the figure, applied the 1st and 2nd hiladas. Blue, alignment lines).
UNION OF FALDILLAS
To unite the skirts, these will be lifted and the asphalt adhesion band will be uncovered. They will be soldered by heating the band with hot air welder or flame blower. They will be pressed slightly to join.
IT 'S ALL RIGHT
The tops, smoothets, side edges, etc., will be made with pieces obtained from the plates. To do this, the following pieces will be cut from each plate, through the cutting area of the skirts:
Obtaining pieces of the view form, approximately. These pieces can be folded in half, on the axis above below, on a wooden heel, for example. To do so, the doubling area will be heated previously. These pieces will be fixed with two ends, nailed to about 25 mm, of each edge, and in the immediate area below the adhesive band. They will be covered by the next piece.
At the top, which has been reached with the plates of both sides, so that one of them overlays it and invades the other a little. These pieces will be applied by starting their placement from the area where winds are produced, more frequently.
Each piece, centered on the top, will close on the pieces of each of the skirts. They will be fixed with two ends, and each piece will cover the above in the corresponding area. They will also be welded, using hot air welder or blower.
IT'S THE END
Special care should be taken to ensure that water is not penetrated at the most problematic points, using other materials that can facilitate the application or facilitate the evacuation of water. For this purpose, asphalt foils, reinforcement or finishing in hard-to-execution points can be used; also metal parts or other materials for auctions, etc. Note.- To ensure the runoff of the water, the edge can be treated with a profile or some other element that avoids runoff by the front of the facade. It will be convenient to ensure the fixing of these parts and to perform a sealing of the areas that can produce more problems, for this purpose it will be possible to use polyurethane mask, type CHOVASTAR, applied with gun, to seal together, glue pieces, skirts, etc.
And that's how the final result should remain.
Past manual of the original instruction of the manufacturer CHOVA:
These instructions refer to the STANDARD model. The CASTOR model is applied in a similar way, with the particularities of the dimensions adjusted to the characteristic no skirts.